JW Anderson is one of the hottest designers around at the mo, and we are very into his Pre-Fall ribbed jumper. We love the self-tying neck detail (no scarf needed with this sweater) But at £515 it’s more than a little out of our budget (just a bit.)

A similar knit is an easy DIY away, and £24 for two new jumpers means you won’t have payday shoppers guilt.
By simply cutting off the sleeves of one jumper you can easily achieve this tie neck look on another.
You’ll need
-
Two knitted jumpers. We used two chunky ribbed grey jumpers from Primark, a steal at £12 each. Whichever jumper you choose to use, a high (but not polo) neck is best.

How to
Laying your first jumper flat on a surface, cut along the outside of each sleeves seam with fabric scissors. Fabric scissors will give you a nice clean cut against the knit.

That’s all you’ll need your first jumper for, but do you think we’re just going to let you throw jumper #1 away, have our DIYs taught you nothing?! No, we’re going to tuck in the armholes open seam ½ an inch, and using white thread, starting from the inside, sew in a straight line all the way around the armhole to create a new hem.
Bobs your uncle….a brand new on trend sleeveless knit! Now, for those spare sleeves…

Lay jumper number two face down on its front, so you are looking at where the back neck label would be. Lay the sleeves either side of the jumper’s neck, with the top seam of the sleeve in line with the top of the jumper’s neck.

With fabric scissors, cut the sleeve in line with the bottom seam of the jumper’s neck, and keep cutting along following the shoulders seam (see photo for clarity). This will make the sleeve fit the jumper from the back, without being too bulky, and allow the sleeve to lie correctly and be tied. Repeat for the sleeve on the opposite side of the jumper’s neck.


As you’ve now cut the sleeve, the seam will be open. To close this up, with your white thread, start from the inside and closely and neatly loop stitches through the sleeve, to sew together, all the way around the open seam until it is all stitched together. Repeat for the other sleeve. Now, to attach to the back neck of the jumper…

As shown on the image below, you want to attach one sleeve approximately two inches into the neck, and another three inches, so the sleeves aren’t exactly the same length for tying.

Line the top of the sleeve against the neck in position, and popping your hand in the jumper neck to hold in position, sew the top of the sleeve to the back neck of the jumper, with short, straight stitches. Leave the sleeve next to the shoulder loose, as this is where the jumper will tie around. (See image to clarify where to stitch)


That’s the first sleeve attached! When you turn the jumper over, the sleeve will fall nicely around the shoulder and down onto the front of the jumper. Repeat the previous step with the other sleeve, attaching to the back of the jumper’s neck. When both sleeves are brought round to the front of the jumper, their ready to tie!


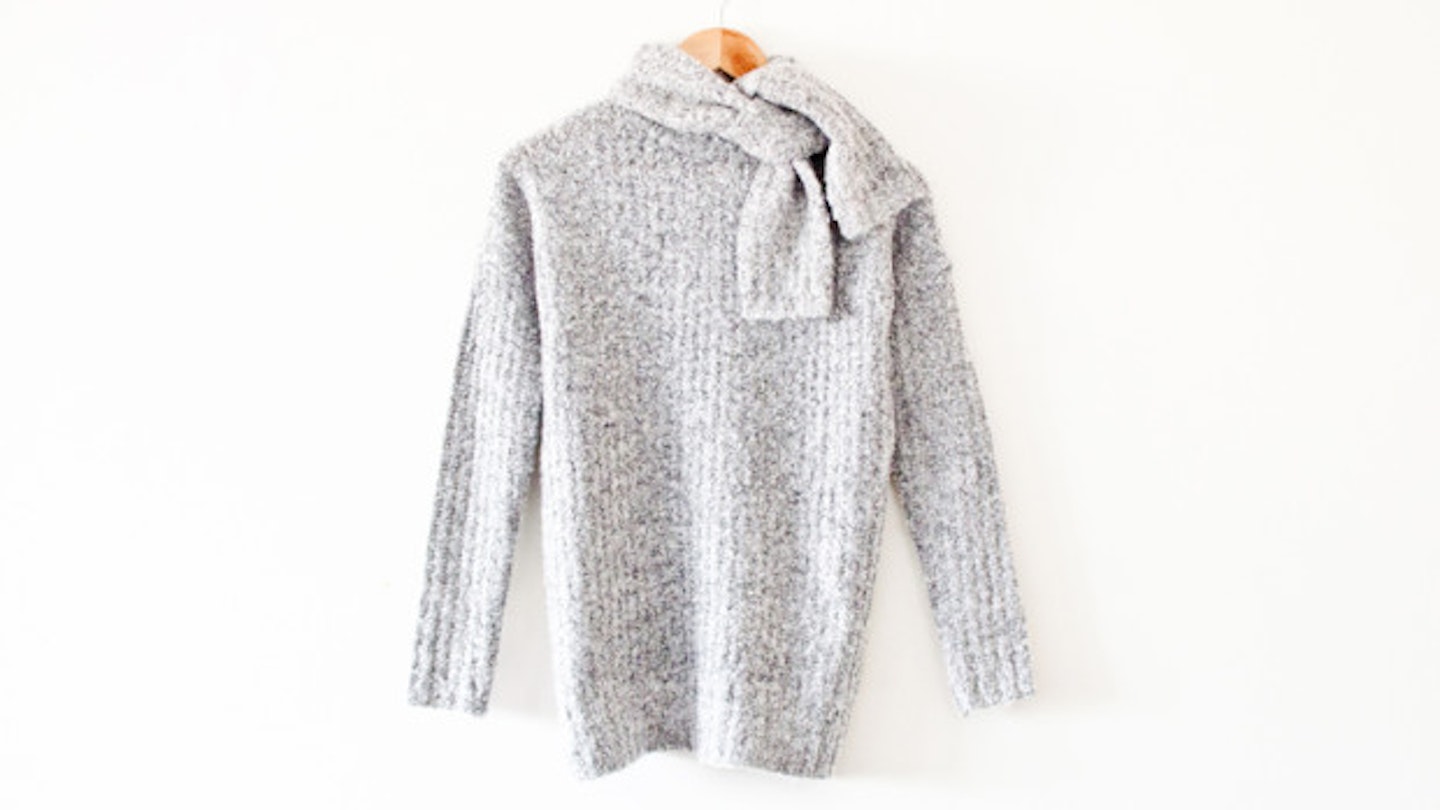
Sleeves no more! Meet your fab new tie-neck jumper, tres chic!
There you have it, a JW Anderson inspired knit and a second new jumper, both perfectly ready for that weekend Instagram #ootd post.
**Liked this? You might also be interested in: **
DIY Patchwork Your Sweatshirt Without Any Sewing For Just £5
Follow Jenny on Twitter @jennybrownlees
This article originally appeared on The Debrief.